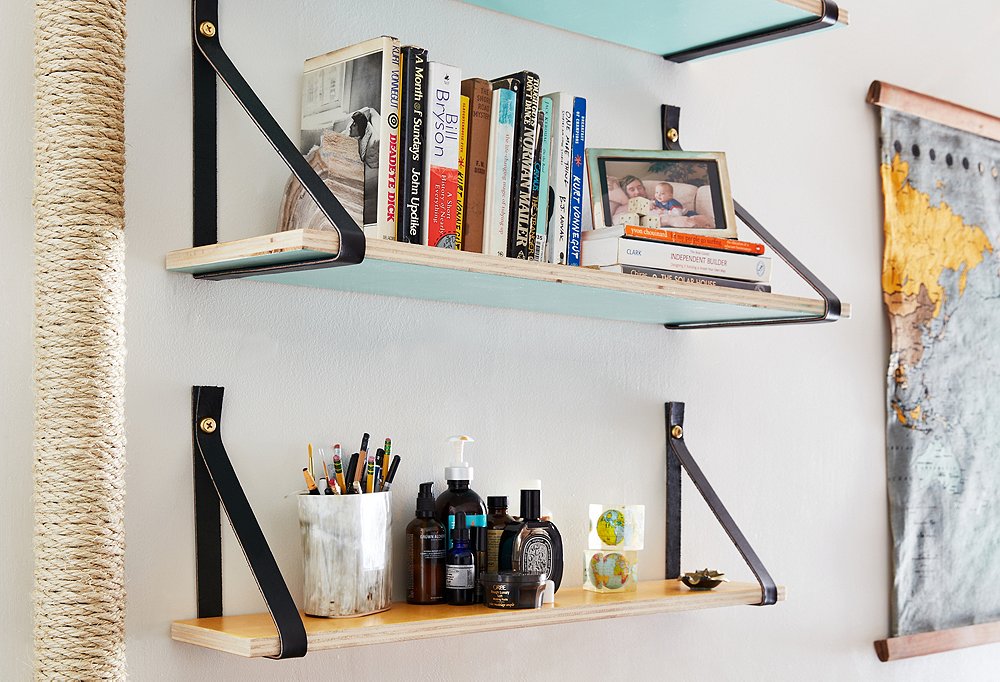
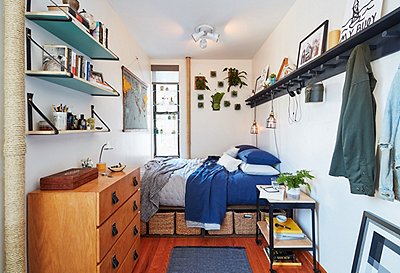
One Kings Lane stylists Anthony Santelli and Drew Welsh are back with another superstylish DIY from their makeover of Drew’s NYC apartment. To give Drew some additional surfaces without taking up any precious floor space, the duo crafted a set of painted-wood shelves supported by streamlined leather straps and finished with brass hardware. Keep reading for their step-by-step tutorial.
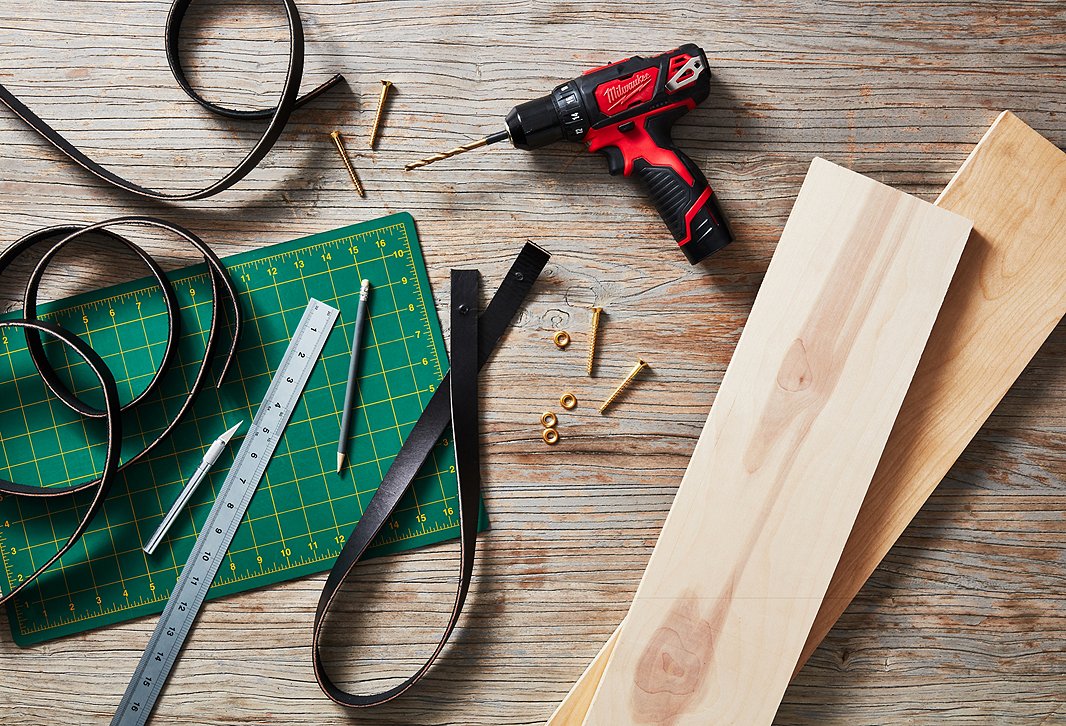
What You’ll Need
– 1-inch wide leather strap
– 1-inch thick unfinished wood plank (we used birch)
– #14 x 2-inch Philips brass flathead drive wood screws
– #12 brass finishing washers
– X-Acto knife and cutting mat
– Metal ruler
– Drill and ¼-inch drill bit
– Level
– Cotton rag
– Small brush
– Latex primer and paint
– 3-inch foam trim roller
– Clear Polycrylic in satin finish
– Mounting hardware appropriate for your wall type
Step 1: Measure
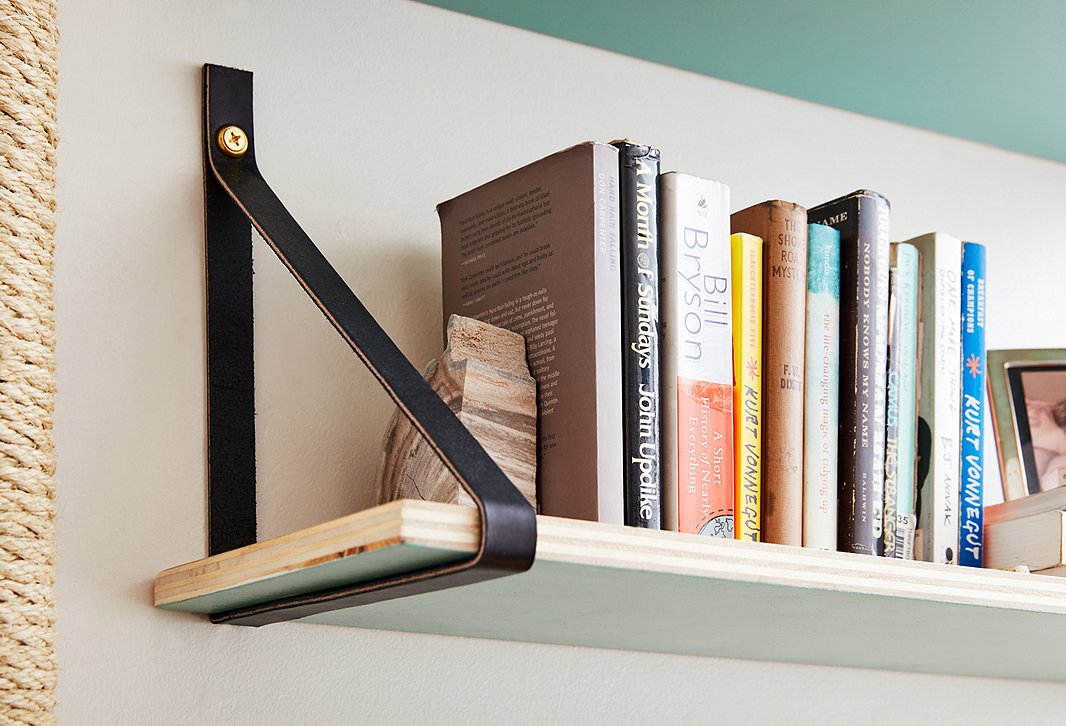
Cut the wood plank into sections to create individual shelves in your desired size. We opted for two 10-inch-deep shelves and one 6-inch-deep shelf for a tiered look, and cut them all to 30 inches long to match the width of the dresser positioned below. (Note: Many hardware stores will cut lumber to your specifications.)
Step 2: Paint
After priming the top and bottom surfaces of each shelf, we painted them in contrasting hues—Honeycomb and Hydrangea, both by One Kings Lane Paint—leaving the edges unfinished for a natural, organic look. (A small foam paint roller is an excellent tool for this job and provides a smooth, even finish.) Allow to dry completely, then use a clean cotton rag to apply a few coats of clear Polycrylic to the unfinished edges of the wood.
Step 3: Cut
Determine the length of leather you’ll need for each shelf support. The deeper the shelf, the longer its supports will need to be; for the 6-inch shelf we used 36-inch leather straps, and for the 10-inch shelves we used 48-inch straps.
Place the leather strap onto the cutting mat. Measure and mark the strap lightly with a pencil where you plan to cut, then use the metal ruler as a guide to cut straight across the leather with the X-Acto knife. Repeat to create the rest of the shelf supports.
Step 4: Polish
Using a damp cotton rag, gently burnish the edges of each leather strap to remove any burrs and create a light polish. (If you prefer a more finished look, use leather wax to give the edges a deeper shine)
Step 5: Drill
Fold one of the leather straps in half, making sure the top edges are lined up. Mark an X in the center of the strap, 1½ inches down from the cut edges. Position the folded leather on a scrap block of wood, then slowly drill a hole through both layers of leather, making sure the top edges stay aligned.
Test the hole to see if it’s flexible enough to accommodate the hardware with a snug fit; you may need to repeat the drilling process to loosen up the leather.
Step 6: Install
Hold two leather supports against the wall and position your first shelf inside the loops, perpendicular to the wall. (You may need a second pair of hands to help you with this step.) Use a level to make sure the shelf is sitting straight and make adjustments as needed. Then, with a pencil, mark the top edges of each leather support on the wall as well as the positioning of the hardware. Be sure to keep the top edges of the leather straps aligned throughout this process. Repeat with remaining shelves.
Drill pilot holes and install wall anchors appropriate for your wall type and the weight of the shelves (plus whatever you plan to put on them). Fit a finishing washer over each wood screw, then secure each shelf to the wall.
Step 7: Finish
To help shape the leather straps nicely to the edges of the shelves and create a tight fit, first remove the wooden shelves from their supports. Using a small brush dipped in water, dampen the inside surface of each leather strap where it will meet the edges of the wood. Reposition the shelves, check again to make sure they’re level, and weight each one down with a few books; allow to set overnight.


Join the Discussion