“There are few hours in life more agreeable than the hour dedicated to the ceremony known as afternoon tea,” wrote Henry James in Portrait of a Lady. And it’s precisely this sentiment that inspired this month’s “How to Host” column.
Introduced in 1840 by Anna, the seventh Duchess of Bedford, afternoon tea started as something much simpler than the affair it’s become. Social protocol at the time called for lunch at noon and dinner at 7:30, leaving a lag just long enough for the duchess’s appetite to take hold. This led to requests for afternoon tea, which soon became a daily ritual, to prevent what she called “having that sinking feeling.” Delivered to her bedchamber at around 3 or 4 p.m., it was served not with petits fours and cream but bread and butter. But as friends began to partake in the activity, word spread, and the trend evolved into the exercise in dress, food, and manners we know today.
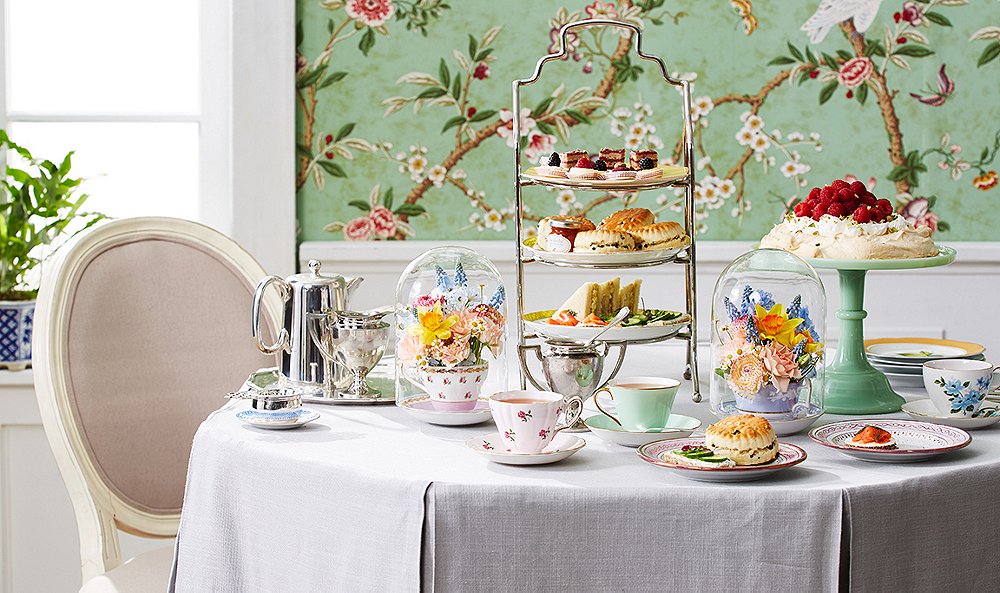
Here, stylist Michelle Wong takes count of all you need to set a sprightly scene—cups in bloom with daffodils under a cloche, a perfect pistachio pavlova, flower-speckled bone china—for an afternoon tea with friends at home that’s just as delightful and lifting as tea at the Ritz.
Take Note of Tea Etiquette
For all the pomp and circumstance swirling around afternoon tea, we thought it only proper to take note of some traditional tea etiquette for setting the table:
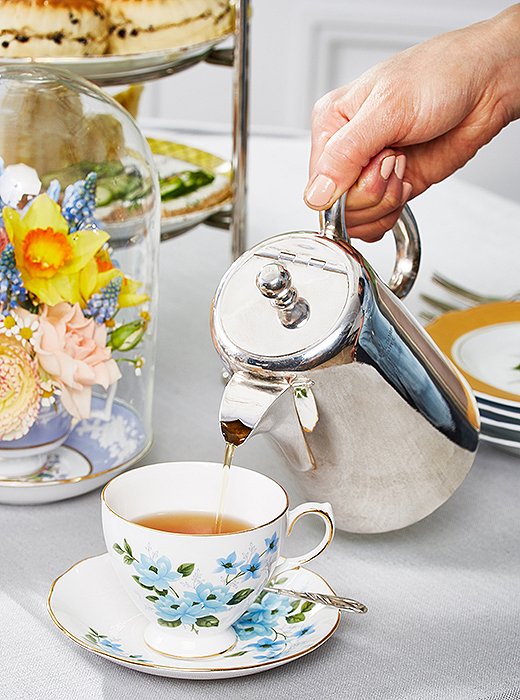
Consider your tea presentation. Be it a caddy, a case, or a canister, take care of how your tea is brought out. You can’t go wrong with Bellocq’s selections of Earl Grey, English Breakfast, or Ashram Afternoon. Pleasantly spiced, each comes in a tin that looks as good as the tea tastes.
Did you know… when holding the teacup, your thumb and forefinger should meet in the handle, pinky down? Also, always add milk after the tea has been poured, and stir north to south or east to west, never round the clock.
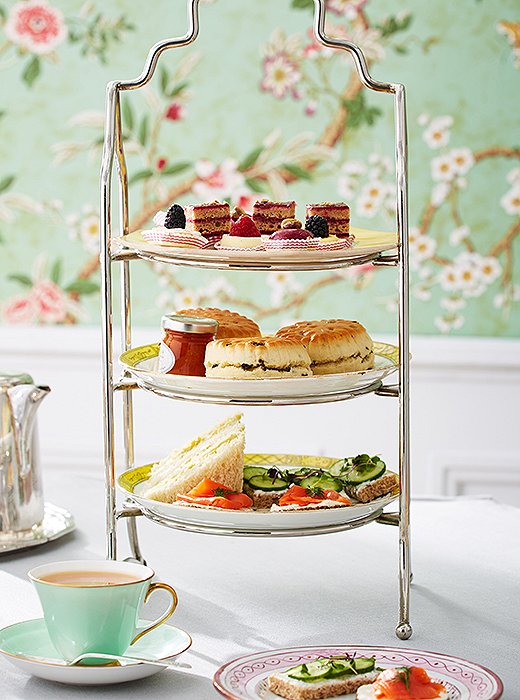
There’s a reason for cake stands. Tiered stands are a customary serving piece for the occasion, upon which everything has a place: sandwiches at the bottom, scones in the middle, and petits fours up top. The idea was that you’d start with sandwiches and move your way up. Here, we opted for a silver stand and a trio of our favorite vintage plates.
Size your tea sandwiches properly. The most important thing to remember is not what’s on your tea sandwiches but how they’re cut; part of what’s so delightful is their bite-size appeal, after all. Trim your sandwiches into triangles, rectangles, or—as the British royals prefer—small squares. Beyond that, what you put inside your sandwiches is up to you. Michelle put her own twist on tradition with three updated classics: curried egg salad, cucumber tzatziki, and smoked salmon on rye. And no need to feel you have to make everything yourself; Michelle went with scones and petits fours from a local bakery to top it all off.
Open-Face Cucumber Tzatziki Sandwiches
Ingredients:
Bread slices
Tzatziki spread
Persian cucumbers
Microgreens
Directions:
1) Spread tzatziki onto a slice of bread. Trim off bread crust.
2) Slice into rectangles.
3) Layer thinly sliced Persian cucumbers on top. Garnish with microgreens.
Curried Egg Salad Sandwiches
Ingredients:
6 eggs
2 tbsp mayonnaise
1 tbsp Dijon mustard
1 tsp curry powder
Salt and pepper to taste
Bread slices
Directions:
1) Fill a saucepan with 6 eggs fully immersed in cold water. Turn heat to medium and bring to a boil. Once boiling, cover with lid and turn off heat. Let them sit for 7 minutes. Rinse in cold water, then peel off shells.
2) In a medium bowl, mix mayonnaise, mustard, and curry powder.
3) Slice eggs into quarters and add to the mayo mix. Continue mixing with a spoon, cutting the eggs into smaller pieces as you do so.
4) Spread egg salad onto bread slices. Cover with another slice. Trim off the bread crust to create a square. Cut from corner to corner to make triangles.
Say Spring with a Cup of Blooms
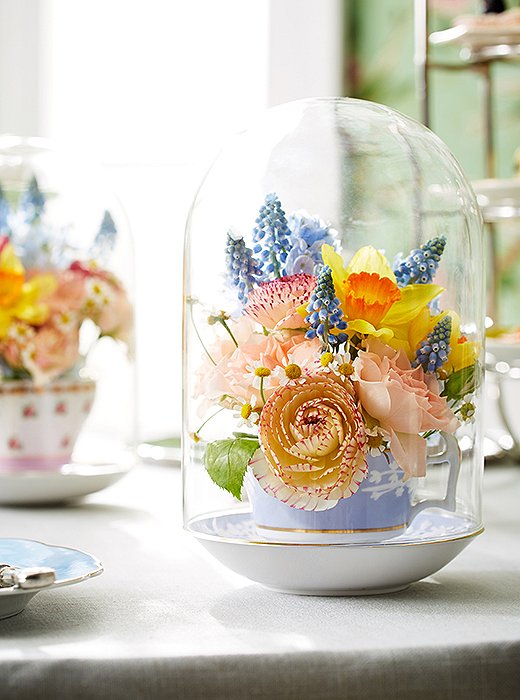
From food to table decor, Michelle wanted to keep everything miniature. To create the petite (but fetching) centerpieces, she used floral frogs to anchor flower stems at the bottom of bone china teacups, then placed a glass cloche over the top of each to finish. Try embracing a spring botanical theme, bringing in sprightly blooms (think daffodils, grape hyacinths, and ranunculus) or even clippings of fragrant herbs; green arrangements with sprigs of rosemary, mint, and thyme can work nicely in place of blooms—a pared-down touch that’s no less fresh.
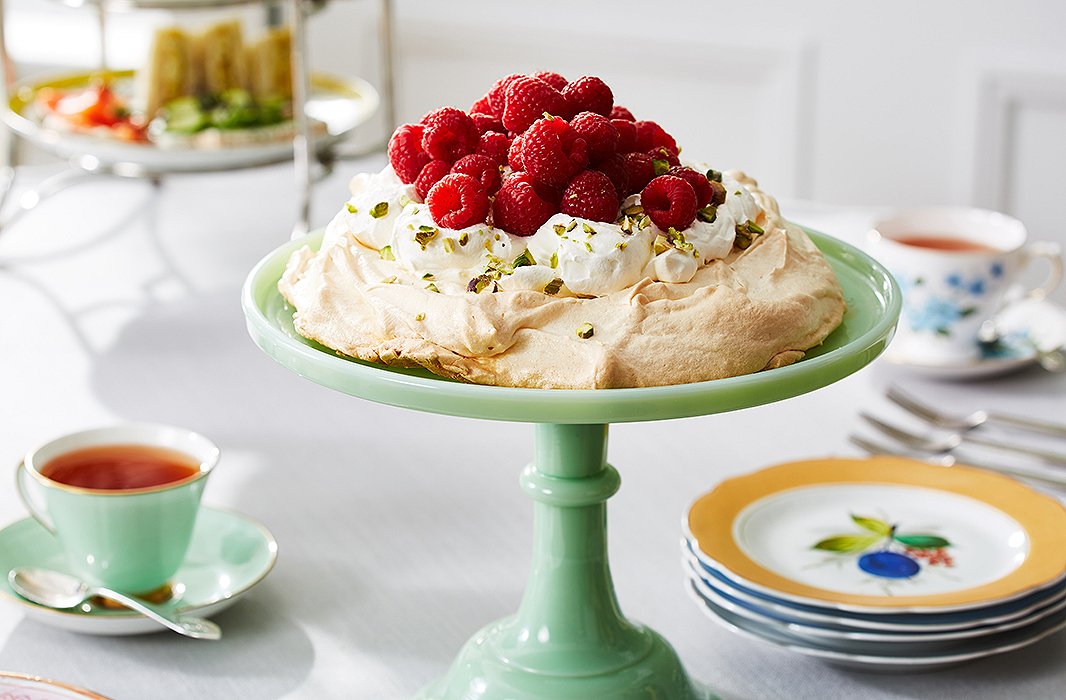
A Berry Special Pavlova
A dessert so good, both Australia and New Zealand lay claim to its origins. An airy meringue base topped with fruit and cream, the pavlova is named after the Russian ballerina Anna Pavlova, who toured both countries in the late 1920s. Australians say the recipe with concocted at a hotel in Perth and named after Pavlova for its lightness (like ballerinas, meringue is also easy to lift). New Zealanders, on the other hand, insist it was concocted at a Wellington hotel, where a chef was inspired by the texture and silhouette of Pavlova’s tutu. Either way, it’s a choice that veers from tradition. Unlike the other bite-size morsels on the table, the pavlova will lose its form as soon as its cut, lending our setup some casual flair.
Raspberry Pistachio Pavlova
Prep: 30 minutes; bake: 1 hour 15 minutes
Ingredients:
6 egg whites from fresh eggs
1 tsp cream of tartar
3/4 cup white sugar
1 tsp cornstarch
1 tsp vanilla extract
1 tsp vinegar
Topping Ingredients:
1.5 cups heavy cream
1 pint raspberries
1/4 cup crushed pistachios
Directions:
1) Preheat oven to 300 degrees F. Trace an 8″ bowl on a sheet of parchment paper. Flip the paper upside down and use it to line a baking sheet.
2) In a bowl, crack and separate 6 egg whites, taking care to exclude all yolks and shells.
3) Using a hand blender or a mixer, whisk the egg whites at a high speed until halfway stiff, then add the cream of tartar to help thicken the whites.
4) Continue beating the egg whites until you have soft peaks. Add the sugar 1 tablespoon at a time, continuing to beat until the mixture is glossy and has stiff peaks.*
5) Add cornstarch. Beat mixture for another 30 seconds.
6) Gently fold in the vanilla extract and the vinegar.
7) Spoon the mixture within the circle drawn on the parchment paper. Working from the center, spread the mixture toward the outer edge.
8) Lower the temperature to 250 degrees F and put the pavlova in the oven for 75 minutes. When the time is up, turn off the oven and let the pavlova cool inside; this will prevent cracking.
* If your egg whites aren’t forming peaks, it could be because your bowl contains residue of grease or detergent.
Topping Directions:
1) In a medium bowl, whisk heavy cream until thickened.
2) Move the pavlova onto your serving platter with a flat metal turner.
3) Fill the center of the pavlova with the whipped cream. Top with raspberries and chopped pistachios.


Join the Discussion